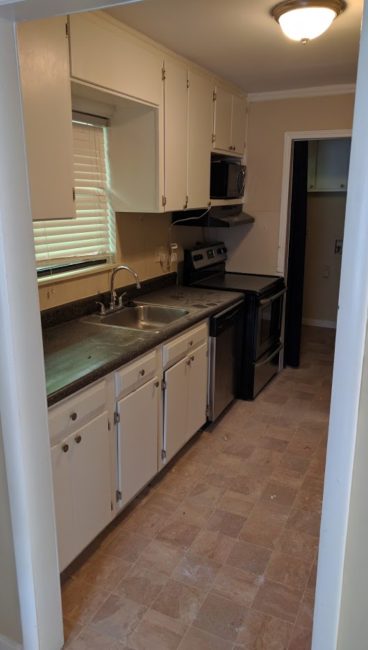
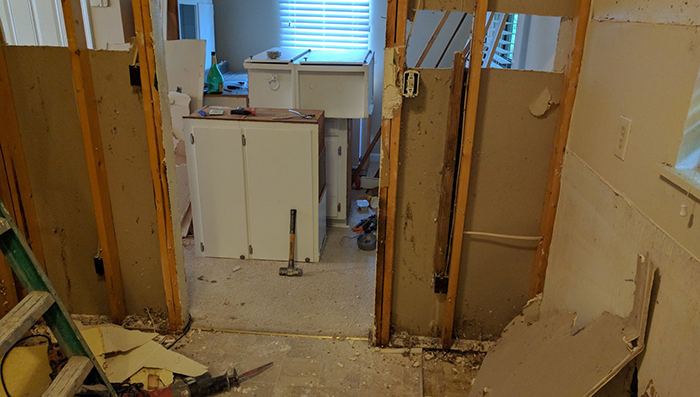
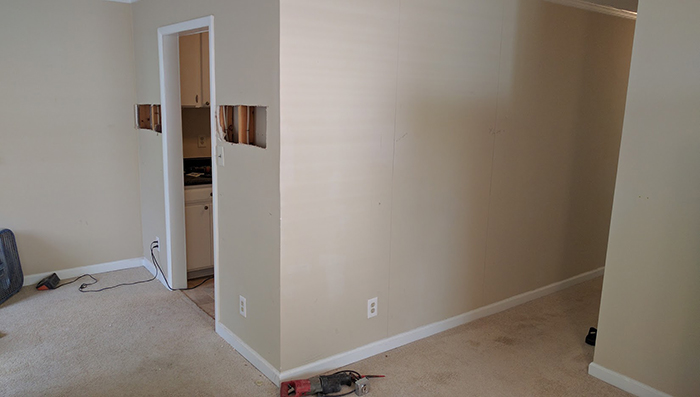
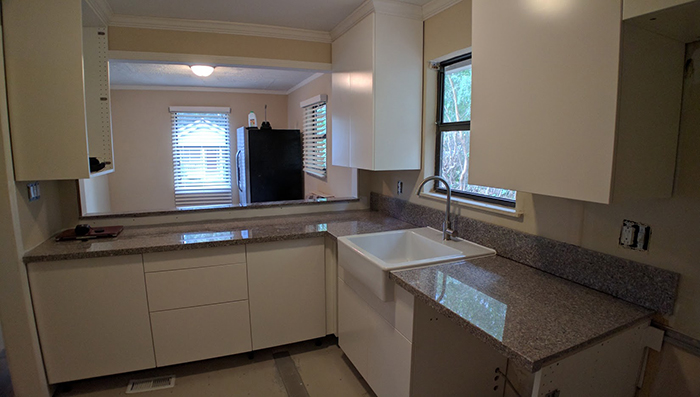
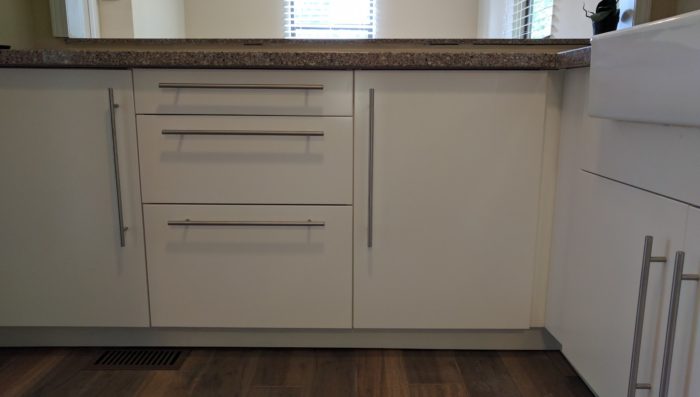
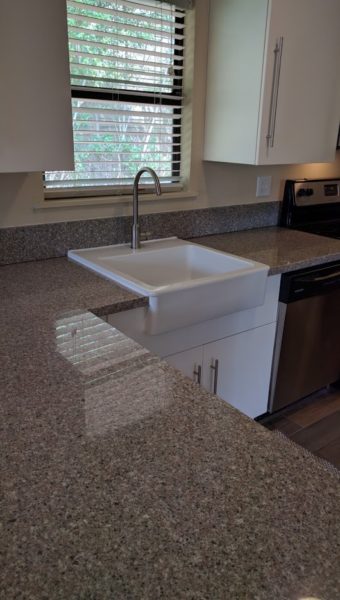
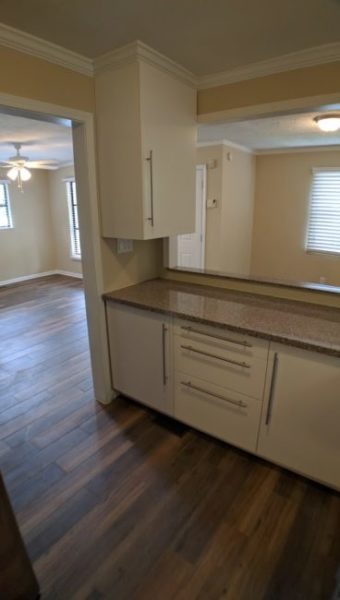
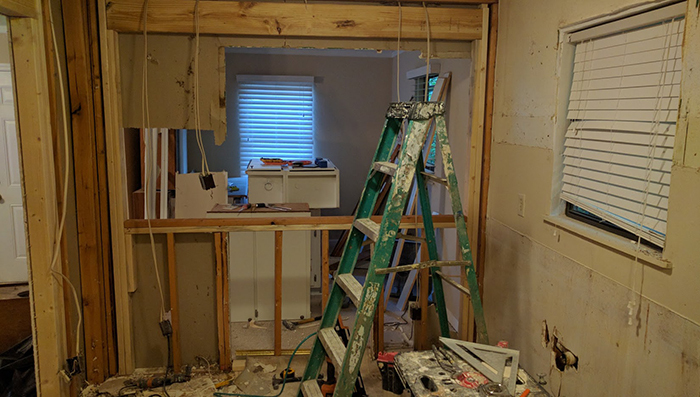
Last month, one of our rental properties looked like this:
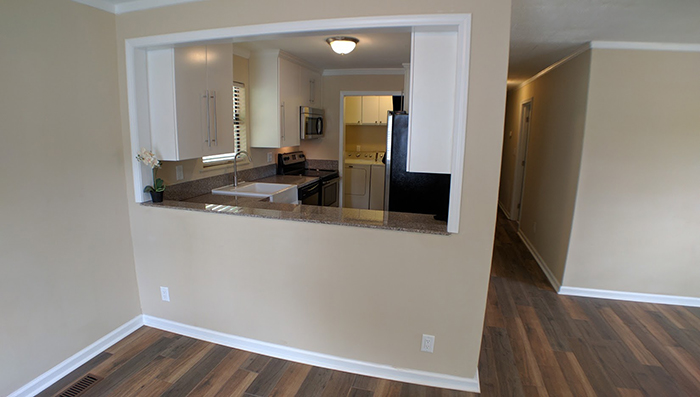
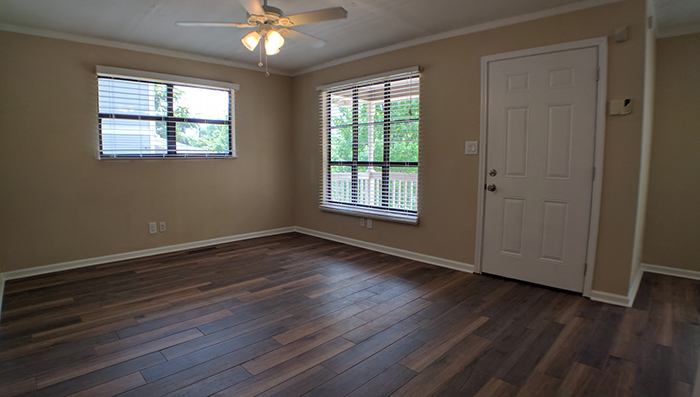
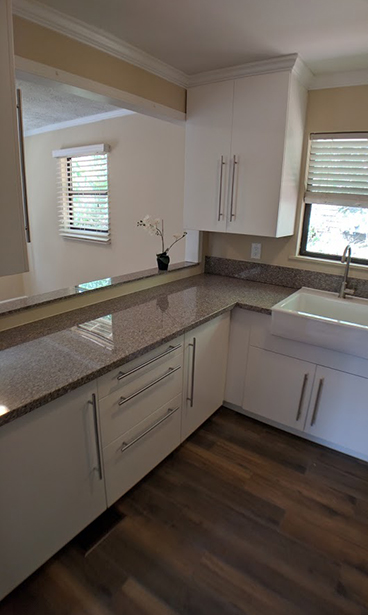
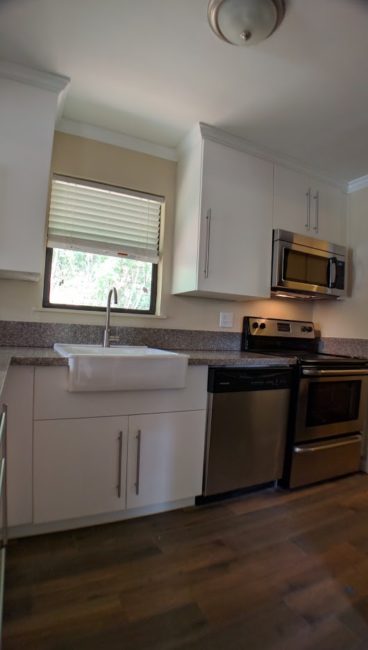
Today, the same property looks like this:
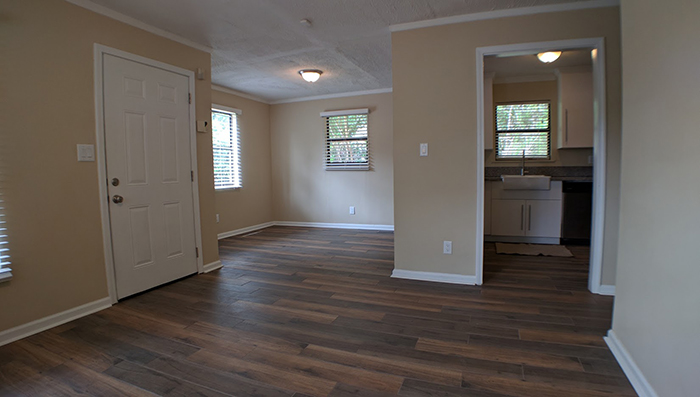
Renovating this rental property took three weeks, cost $13,648, and increased our rental income by $3,450 per year. We worked roughly 38 hours, spread across those three weeks.
Want to learn more about maximizing rental income through renovations? Read on.
Welcome to the June/July 2016 Rental Property Report.
If you’re a new reader, here’s quick background:
As of today (August 2016), my partner and I own seven rental property units, all located in Atlanta. (We live in Las Vegas.) These include one triplex and four single-family homes.
One of my goals is to eradicate myths and misunderstandings around rental property investing, like:
- “You’ll be a gazillionaire!”
- “You’ll be in the poorhouse!”
I hear erroneous assumptions on both sides of the spectrum. Both are equally worrisome.
That’s why I publicly disclose the monthly income, expenses and cash flow we receive from our rental properties. I contextualize this by documenting the amount of time we spend managing our rental business.
I hope this transparency can help people develop realistic expectations and make more informed choices.
If you’re a new reader, please read the FAQ HQ, which explains the background in more detail.
With that said — let’s get started!
In this report, I’ll detail June and July’s numbers, plus describe last month’s bottom-line-changing renovation.
June 2016 – Real Estate Report
Let’s start in June 2016. We collected $9,603.50 in rental income after paying management fees, when applicable. We also received a big insurance refund that we were expecting, bringing the total income on the books to $11,521.01.
Here’s the June income breakdown:
Unit 1, Triplex: $2,750
Unit 2, Triplex: $1,490
Unit 3, Triplex: $1,295
House #2: $850.50
House #3: $1,273
House #4: $1,500
House #5: $445.00
Insurance Refund from May: $1,917.51
Total Income: $11,521.01
“Hey, why’d the House #5 income drop?”
Ah, cool story —
During a routine inspection on House #5, our property manager noticed minor maintenance issues: clogged gutters; damaged closet doors.
She hired a contractor, gave him instructions, and oversaw his work. She paid him directly, deducting this from our payout.
Here’s the kicker:
She didn’t bother telling us in advance, per our request.
Result? The work gets done without a shred of our time, energy or attention. Score!
I learned this time-saving tactic in The 4-Hour Work Week. The author, Tim Ferriss, explains that he used to sell consumer products. He hired a customer support staff, but he logged countless hours advising his team about how to handle specific, one-off scenarios.
Finally, in frustration, he emailed his team to say: “Keep the customer happy. If it’s a problem that takes less than $100 to fix, use your judgment … Fix these problems without contacting me.”
He offloaded hours of emails as a result.
The lesson? Empower others, in order to optimize your time.
We applied this lesson to rental properties, authorizing our property manager to spend $500 or less without our permission. The worst-case scenario is that she makes a dumb decision, wasting $500. The best-case scenario is exactly what unfolded above.
Over the long-term, our property manager might spend slightly more (or less) than I might choose. But the difference is likely to be a rounding error. I’ll happily pay a little extra to avoid getting sucked into trivial decisions.
Here’s what I’ve learned through this:
If you’re grappling with a decision, ask yourself:
- Do I want the likely-long-term-scenario?
- Can I live with the worst-case scenario?
If you answer “yes” to both, take the leap.
Back to the June 2016 report.
June’s gross income is $11,521.01, after management fees and minor maintenance deductions. What about other expenses?
Mortgage: $3,524.03
Mortgage, Part II: $583.33
Umbrella Insurance: $58.75
Materials for House #4 Remodel: $1,888.23
Water: $164.16
Home Depot: $63.38
Handyman: $100
Total Expenses: $6,381.88
This means ….
Cash Flow: $5,139.13
Wahoo! The rental properties boosted our bottom line $5,139 in June.
How much time did this consume?
We spent a combined total of 8 hours on our rental property business in June. We spent this time:
- Coordinating with our contractor about July’s upcoming House #4 renovations.
- Planning the kitchen remodel for House #4.
- Trip to IKEA to look at cabinet samples.
- Ordering IKEA cabinets online.
- Random phone calls with tenant.
- Reviewing monthly statements.
Bottom Line: In June, we spent 8 hours managing the rental properties and collected $5,139.13 in cash flow, after expenses.
July 2016: The Renovation Begins. (And Ends.)
Get ready for a shocker. You’re going to see something unprecedented in July’s report: negative cash flow.
We spent more than we earned.
Last month, July, the rental properties brought in $8,663.50 after management fees, when applicable. Here’s the breakdown:
Unit 1, Triplex: $2,915
Unit 2, Triplex: $1,490
Unit 3, Triplex: $1,295
House #2: $850.50
House #3: $1,273
House #4: — (under renovation!)
House #5: $840.00
Total Income: $8,663.50
What about expenses?
Mortgage: $3,182.64
Mortgage, Part II: $583.33
Umbrella Insurance: $58.75
House #4 Remodel: $11,760.68
Water: $151.84
Lawn Care: $27.00
Total Expenses: $15,763.74
Okay, are you ready?? Drumroll please ….
Cash Flow: -$7,100.24
We’re in the red, baby! Negative!
“Um, Paula, you’re excited about this?”
Heck yeah!
“Uhhhh …. why?”
Two reasons.
First, this wasn’t an accident. We planned this negative cash flow, and I’m proud of the result. We transformed this:
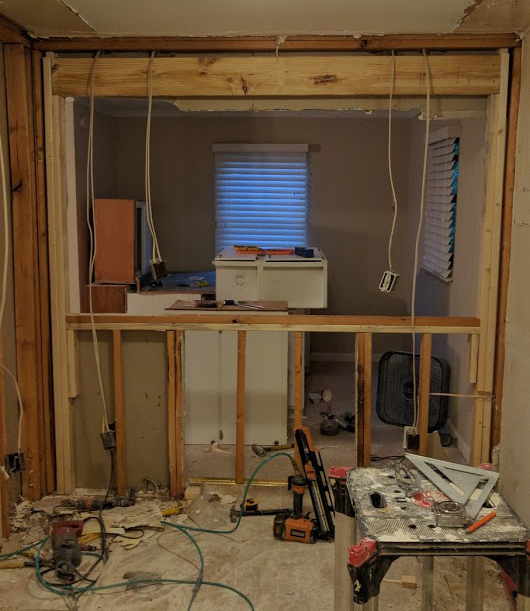
Into this:
(Things get worse before they get better.)
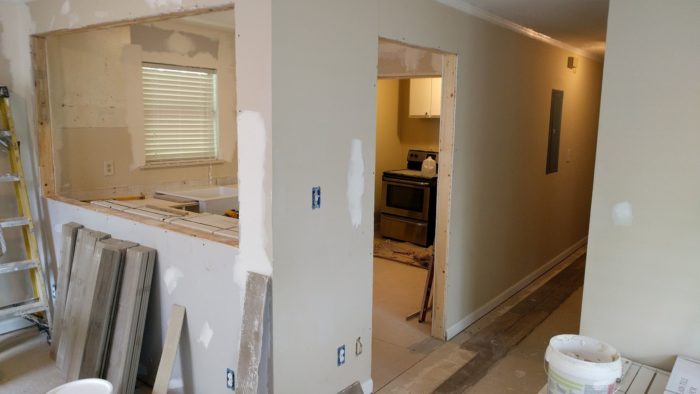
And finally into this:
There’s a second reason I’m excited to report July’s negative cash flow:
Frankly, it’s about damn time.
I’ve published our cash flow for almost a year. I haven’t posted a negative month yet. This doesn’t create a balanced story. The July 2016 report, finally, allows me to paint a fuller picture.
When we remodel a property, our cash flow nosedives into negative territory.
If you’re thinking about buying rental properties, I want you to take a long, hard look at this reality. Ask yourself:
- Are you comfortable holding investments that drop into the red? …
- … Or would this trigger panic?
There’s a pragmatic, mathematical aspect to that question: “Do you have enough savings to survive the lean months?”
But there’s also a crucial emotional aspect to that question: “Can you stomach this?”
Do you want to vomit at the thought of negative cash flow? If so, understand this about yourself before you choose an investment path.
That said —
Let’s dive into the renovation details. Welcome to July 2016, when we spent $7,100 more than we earned.
Renovating: From “Meh” to “Whoa!” in One Month
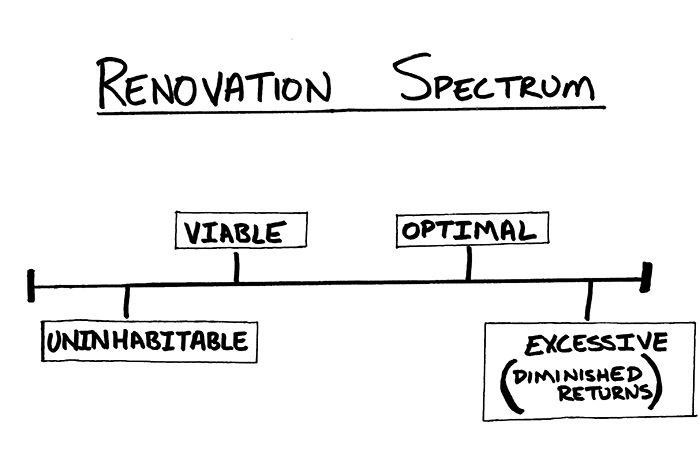
Imagine every home sitting along a Renovation Spectrum.
At the far extreme of the Renovation Spectrum, you’ll find uninhabitable properties. At the other far extreme, you’ll find excessively-renovated beauties.
But things get interesting in the middle of the spectrum.
You’ll find viable properties mid-spectrum. These properties are fine. The problem is that they’re merely fine. That’s a synonym for “sub-optimal.”
Viable properties don’t perform at their peak potential. As a result, the owners leave money on the table.
You’ll also find optimal properties mid-spectrum. These properties are among the best rental candidates on the block. If a tenant tours five similarly-sized properties in the same neighborhood on the same day, they’re most likely to be “wowed” by the optimized (and excessive) ones.
To illustrate this —
Let’s climb into the Time Machine. Let’s travel to July 2013, when we bought House #4 as a bank-owned foreclosure.
Foreclosed properties often need immediate repairs. For example, we poured $10,000 into renovating our first foreclosure investment, House #2, to elevate it to basic living standards.
House #4 is different.
The national bank that sold this property — unfortunately — also “renovated” the home. Sigh. They shouldn’t have bothered. The drywall is splotchy. The front door squeals at every attempted use. The aging kitchen cabinets bear a thin coat of fresh paint; a veneer of restoration.
When we bought House #4, the property was viable. It was fine.
We saw room for improvement.
But we decided to wait. One reason: House #4 was already — ahem — “newly renovated.” (Imagine loads of sarcasm.) We also had tight schedules and wanted to save more cash. We decided to rent the property for a few years before renovating.
We rented House #4 for $1,300 per month, enough to meet the One Percent Rule. We found a clean, quiet, responsible tenant, who renewed his lease twice. After the neighborhood improved, we raised the rent to $1,500 per month. He renewed again.
But great tenancies must eventually end. Our tenant broke the news a few months ago: He’s buying a house.
That’s when we chatted about our options.
Option A: Rent the property as-is. #Viable
Option B: Tap the property’s potential. #Optimal
We chose Option B. We needed two things: money and plans.
Money: Thanks to our many positive-cash-flow months, and our tendency to save, we could pay cash for the remodel. Done.
Plans: Planning this remodel required deep, creative thinking. We wanted to expand the kitchen. We wanted to re-imagine the space with a modern, open floorplan. We’d need to brainstorm ideas.
One more thing: We live in Las Vegas. The property is located in Atlanta. We’d need to design this new layout/floorplan/kitchen expansion from 2,000 miles away.
Challenge accepted.
How To Plan a Renovation (without Visiting the House)
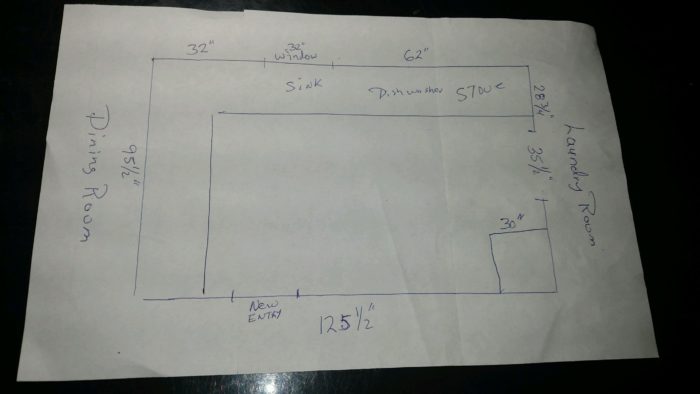
First, we called our contractor. We asked him to visit House #4, taking measurements and drawing the current floorplan. He agreed, and texted me measurements, photos and drawings by the end of the week.
Armed with this information, we sketched ideas on a whiteboard in my Las Vegas home office. After countless iterations, plus a few phone calls with our contractor, we developed this preliminary sketch:
The creative brainstorming-and-planning phase took around 8 hours, all in June. Meanwhile, our contractor organized local logistics.
By the time our tenant moved out on July 1st, we were ready to start demolition.
Bigger Kitchen; Same Footprint
It’s hard to describe the renovation in words. Here’s my best attempt.
We had two goals:
- Expand the kitchen
- Open the floorplan / modernize the layout
We targeted the wall that divides the kitchen and dining room. (In the photograph below, this is the wall with a doorframe and two drywall cut-outs.)
For reference: the dining room includes the carpeted space on the left side of the photo. The kitchen is located through the doorway, on the “inside” of that wall.
We asked our contractor to remove the top section of this wall. This created a visual connection between the kitchen and dining room. It also flooded the dark kitchen with natural sunlight.
Our contractor framed and drywalled the bottom half of this doorway, creating a continuous 36-inch wall between the kitchen and dining room.
Here’s how this looked with framing-only:
Here’s how this looked after adding sheetrock:
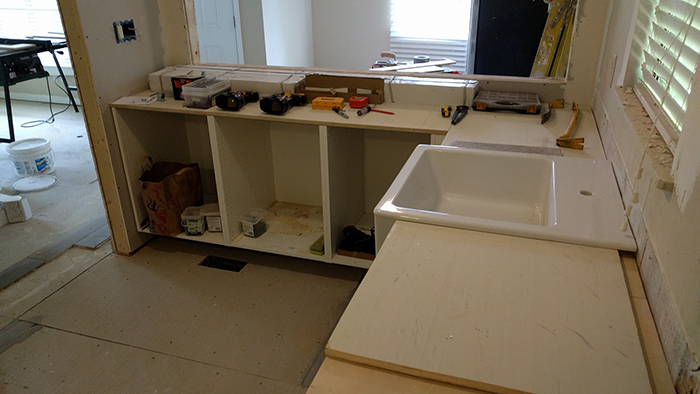
The contractor installed base cabinets along the kitchen-facing side of the wall. The former-galley kitchen now holds an “L” shape.
The result? We nearly doubled the kitchen’s cabinet and countertop capacity, expanding the usable kitchen space without changing its square footage.
Check it out:
Open Floorplan; Same Walls
We asked our contractor to frame the opening above those base cabinets. This created an open floorplan feeling, a visual connection between the kitchen and dining rooms. We installed countertop-matching granite to heighten the effect.
Our contractor also tore out the existing flooring in the kitchen, dining and living areas. He replaced everything with an inexpensive, durable tile that resembles hardwood. This holds several advantages:
- This visually connects the kitchen/living/dining areas, emphasizing the “open floorplan” feel.
- This relieves us from the stress/burden/cost of maintaining carpet or hardwood.
Beautiful and durable? Double-win.
How Much Time Does a Renovation Require?
The renovation spanned three weeks, from demolition to finishing touches.
We planned in June (8 hours) and executed in July (approx. 30 hours, although this is a rough estimate. More details below).
Before the work began, we needed to decide how much involvement we wanted.
As background, we’ve worked with our contractor for years. We’re comfortable with his quality, speed, pricing and — most importantly — his integrity.
Thanks to our excellent contractor, we’re normally absent from most renovations. When we gutted-and-replaced the House #5 kitchen, for example, I communicated with him by text message from California. (You can read that story here.)
But Will decided to oversee House #4’s renovation in-person. I asked him to write about his experience for this blog post.
The following is his story, written in his words, unedited and unchanged.
[This is Will writing]:
Normally, when I need to do a renovation or remodel, Paula and I will plan it out together and then we’ll just have our contractor do the work without much direct involvement from either of us.
This time was a little different. In this project, we wanted to reconfigure the space a little more than normal and also provide a very high level of finish. And when that happens there can be many daily decisions. Yes, working through these can be done by phone or text, but I needed to travel to Atlanta anyway for my day job, so I decided to stay longer and oversee the project in person.
Time tracking is a little tricky on this one. I’ll leave it up to you, the reader, to decide how you might consider the time spent. I’ll just tell you what my experience was like.
I’d wake up and drive over to the house, normally before the contractor arrived. That would give me time to review the previous day’s progress and think about next steps. If there were any corrections or changes to be made, I’d note them.
When the contractor arrived, we’d go over that day’s checklist and make any revisions to it based on his staffing for the day and his input. Then, the team would get to work and I’d go off into a back bedroom to do my other work for my day job on my laptop. If there was a question that came up, I could just pop in to the other room and advise. It also gave me an opportunity to review work as it was being performed to ensure it was in line with my vision of the final output.
Some days I would leave in the early afternoon. Other days I might stick around until the end of the day or even do a quick Ikea run for some cabinet component so that the workers would be free to continue working uninterrupted.
On average, I’d say that I probably contributed anywhere between 1-3 hours of my time per day for three weeks in an active sense. The project averaged five days per week, but there was a little variability due to the Fourth of July holiday and other scheduling necessities. I was also sick a few days, so I wasn’t always able to make it to the project.
(Quick note about being on site with the contractor- I was definitely conscientious of being a good client/collaborator with our contractor. We have a long and good relationship, so I was careful not to get into micro-managing territory and only intervene if something was actually important to the final outcome.
Still, it’s a reasonable question to ask why I chose to be so actively involved in the daily planning. The reasoning is simple: Since I was not executing the work, it was easier for me to step back from the project and see the next steps objectively. Time spent planning would take work off the contractor’s plate. I wouldn’t necessarily do this with all contractors, but in this particular case the arrangement worked well and he was glad to have the daily briefings.)
You’re not going to see the hour tracking reflect this project outside of pre-project planning time for the simple reason that I can’t honestly give a precise figure. On one hand, you could say that it was a full-time commitment for a couple weeks in July. Thing is, I was usually doing work for my day job while I was at the house, so that complicates the hourly calculation. And how do I count when I went to lunch, then brought back food for the crew? Were those working hours? In the end, I’m viewing this remodel as a voluntary-but-optional personal time involvement.
In terms of the passivity of this activity, I’d contextualize this remodel more like an initial purchase remodel. When we bought house #4, we knew we would be tearing out the kitchen within a few years, but due to our schedules at the time we decided to postpone it until now.
Final geeky remodel note: I’m never doing another kitchen again with anything but Ikea cabinets. First, they’re easy to install. You attach a steel rail to the wall; the cabinets hang from this rail. This means they’re automatically level. Also, they have an excellent warranty and they’re almost always in-stock. Contrast this with the experience of a typical cabinet setup, in which you either get limited and unfashionable in-stock choices from a big-box store, or you endure long wait times on custom units. (Did you mismeasure just a single base cabinet? You’ll be waiting weeks for a the right one to come in. Meanwhile, no installing that countertop!) You can’t return custom built cabinets. And leveling and hanging these cabinets involves a cryptic array of shims, studfinders and extended cursing. Anyway, my point is that I’m only using cabinets from Ikea from here on out. I can’t recommend them enough.
Anyway, here’s the time I logged in July:
- 1 hour going over some new lease details with a tenant in the Triplex.
- 2 hours updating and posting the new ad for House #4
- 2 hours conducting open houses at House #4
- 3 hours emailing and talking to prospective tenants for House #4
- 45 minutes planning and communicating with property manager about making upgrades to House #2 after the current tenants move out (slated for August/September)
- 1-3 hours a day for three weeks — Various hours managing/checking the contractors on-site for the House #4 remodel.
July Total Hours: 8 hrs, 45 min, plus various time during the House #4 Remodel.
TL;DR – The Costs vs. The Benefits
[This is Paula again.]
Thanks Will! Let’s recap:
We kicked off and finished a major renovation on House #4 last month.
Cost: We spent $13,648 on the renovation in June and July. (We paid $11,760 in July and $1,888 in June.)
Time: Will estimates that he spent between 1-3 hours per day, for three weeks, overseeing the renovation.
- The low end of this range adds up to 15 hours (1 hour per day, 5 days a week, for three weeks).
- The high end of this range adds up to 45 hours (3 hours per day, 5 days a week, for three weeks).
- The average is 30 hours.
He also documented another 8 hours, 45 minutes on other rental property tasks. (I didn’t do anything in July.)
So … I’m not sure exactly how much time Will spent on rental properties in July, but a reasonable estimate is roughly 38 hours, 45 minutes. (Alternately, you could describe it as “three weeks” of hanging around.)
Benefit: Before the renovation, House #4 rented for $1,500 per month. We advertised the property for $1,895 after the renovation; we’ve received two applications.
Update: We found a highly-qualified tenant who was willing to sign a longer-term lease. We negotiated a rental rate of $1,795/mo in exchange for the longer lease term.
Bottom Line: We can reasonably estimate that this $13,648 investment, plus roughly 38 hours of work, increased our rental income by an extra $295 per month. That’s an extra $3,450 per year.
Not bad, eh?
P.S. Want to learn more? I created the real estate course I wish I had when I started. It’s called Your First Rental Property. Please join the free VIP List if you’re interested in getting updates about the course. Thanks!
